We cover all aspects of your home including electrical. Call 1 Home Electrical 704-614-3420
We cover all aspects of your home including electrical. Call 1 Home Electrical 704-614-3420
Do you realize that you will have issues with your electrical system at some point? Keep in mind that this can disrupt the activity in your home and workplace if you work from home and cause a lot of headaches. No one wants this when they work from home. They want to make sure that they can do the job nicely and without any inconvenience.
They’ll be plenty of people who are working from home, who have got themselves new filing cabinets to help them stay organised, but many of them forget to get their electrical system checked, and this is actually super important. Some customers have cabins or small barns outdoors as a portable office. Getting electrics outdoors can be risky, so you need to make sure everything is tip top so your outdoor work is not interrupted by any issues.
Speaking of issues, internet connectivity can be one when you are in a work from home model. In such situations, you would have to look for a reliable internet service provider such as Cox internet or others like them in your vicinity that can provide high speed and customizable bundle internet plans. Doing this can make sure that your workflow won’t be hindered by any type of network interruption. You want to get things up and running as quickly as possible. That said, keep our # handy so you have someone that you can rely on.
Here some tips to keep things going.

Making tight electrical connections is critical to a safe wiring job. If wires come loose, you could get arcing and overheating, which could lead to a fire, However, thanks to reliable connectors and terminals, it’s fairly easy to make safe, strong connections. But there are a few things you have to watch out for. We’ll show you how to pick the right connector for the job, for example you might need military connectors if they’re going to be victims to the elements, and how to prepare the wires for the best connection. We’ll also show why you should spend a little extra money when it comes time to buy outlets and other devices. With careful attention to detail, you can rest easy knowing your wiring job is as safe as you could possibly make it.
Choose a connector that fits the wires
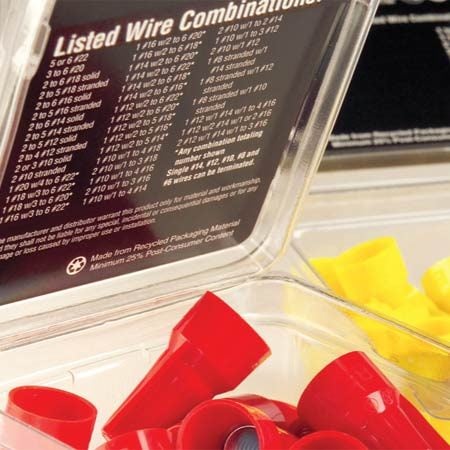
Wire connectors
Wire connectors come in many sizes.
Every wire connector is made to join a certain minimum and maximum volume of wires: The larger the wire gauge, the fewer it can hold. Always check the approved list on the packaging (photo above) to make sure the connector is listed for the wire combination you want to join. Even though the connectors appear to be color coded, you can’t rely on this. For example, one style of yellow connector joins up to four 14-gauge wires, while another connects a maximum of three. You have to check the label on the package or go to the manufacturer’s Web site to find out. Keep a range of small to large connectors and their packaging on hand so you won’t be tempted to make do with the wrong size.
Line up the wire ends, then tighten
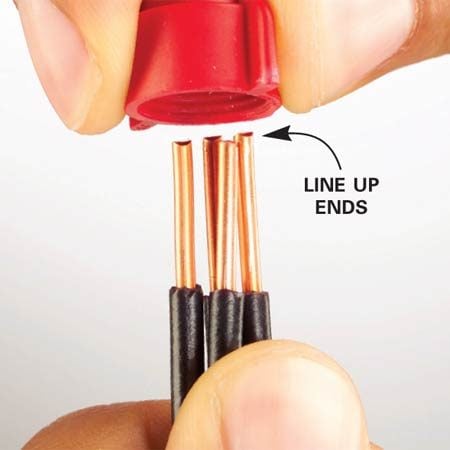
Photo 1: Install the wire connector
Place the connector over all of the wires.
With the exception of stranded wire, which we’ll talk about below, it’s important to make sure the ends of all wires are lined up before twisting on the connector. Otherwise the connector won’t clamp all wires evenly and one or more could slip out.
Start by stripping the ends of the wires. Check the label on the connector package for the length of bare wire to expose. For all but the smallest and largest connectors, this is usually about 1/2 to 5/8 in. Then arrange the wires parallel to each other with their ends aligned. Keep your eye on the wire ends until the connector covers them to make sure none slips out of position. You don’t have to twist the wires together before you screw on the connector. Simply twist the connector until the insulated wires outside the connector begin to twist. Photos 1 and 2 below show how to install the connector. When you’re done, tug on each wire to make sure they’re all firmly connected.
Buy a wire-stripping tool
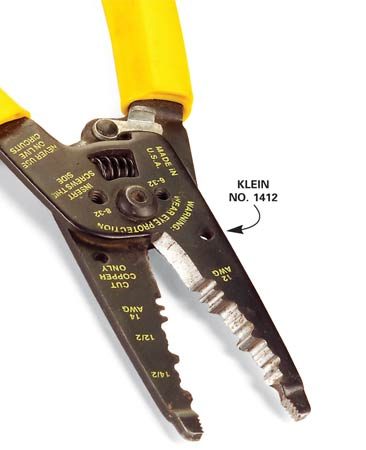
Wire stripping tool
Wire-stripping tools do a fast, clean job without nicking and weakening the wires. For most standard house wiring requiring 12-gauge and 14-gauge plastic sheathed cable, I like the Klein No. 1412 stripper ($18) shown here. It can cut the plastic sheathing of 12-2 and 14- 2 plastic sheathed cable, as well as strip insulation on individual wires.
Extend stranded wire 1/8 in. beyond solid wire
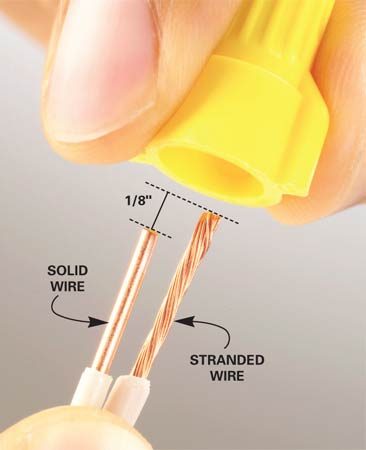
Extend stranded wire by 1/8 in.
If you hold the ends of solid and stranded wire even with each other while you screw on the connector, the stranded wire will often wrap loosely around the solid wires, resulting in a loose connection. This is especially likely when you’re joining multiple solid wires to one stranded wire. The problem is easy to prevent by extending the ends of all stranded wires about 1/8 in. beyond the solid wires. Then install the connector as usual.
Tip:
Stranded wire is a little larger than the same gauge of solid wire. Use a wire stripper labeled for stranded wire, or use the hole for the next largest gauge of solid wire. Remember to tug on each wire to make sure the connector has a solid grip.
Loop the wire for a strong screw connection

Photo 1: Bend wire for a screw connection
Since switches and outlets vibrate a little when used, it’s critical that the connections to them be strong so they don’t work loose. For screw connections, start with a 3/4-in. length of bare stripped wire. Photos 1 and 2 show how to bend the loop and close it around the screw. Wrap the wire clockwise around the screw so that the loop closes as the screw is tightened. Make sure to tighten the screw firmly. Keep in mind that only one wire is allowed under each screw.
Cut off nicked, bent or twisted ends

Use a stripper tool to expose clean, bare wire
Wires that are bent, twisted or nicked are weaker and won’t nest together as easily in the connector. Before you reconnect wires to an outlet or switch, or rejoin several wires with a connector, cut off the old bare wire ends and strip the insulation to expose clean, straight wire. It takes a few extra seconds but ensures a better connection.
Tip:
If cutting a wire leaves it too short to work with easily, splice on an additional 6-in. length with a wire connector
Buy top-quality outlets for the best connections
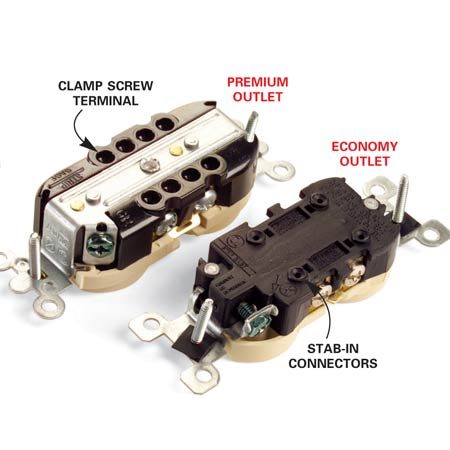
Photo 1: Premium vs. economy outlets
Look for premium outlets with clamp screw terminals.
At most home centers, you can buy an economy outlet for about 50 ¢ or you can spend about $1.75 for a better one. That’s a big jump in cost for something that looks similar and does the same job. It’s tempting to buy the cheap one. But you get what you pay for. Premium outlets are stronger, make better contact with plugs and work more smoothly. Cheap outlets can literally wear out if you use them frequently. If you decide to buy premium outlets, look for the kind with clamp screw terminals (Photo 1). They resemble the “stab-in” holes you’ll find on economy outlets but actually clamp down firmly when you tighten the screw. If you don’t want to spend the extra money to install premium outlets everywhere, at least put them in heavy-use areas like kitchens, garages, workshops and laundry rooms. Some of these areas may require GFCI protection. Always check with your local electrical inspector before replacing outlets.
Strip the wires to the length shown on the stripping gauge (Photo 2). Loosen the terminal screw by turning it counterclockwise to open the clamp. Then hold the wire or wires, one in each hole, while you tighten the screw. Tug on the wires when you’re done to make sure they’re securely connected.
Remember to always keep it safe and call a professional.
704-614-3420